Foreword
1.1. Blockchain
Blockchain is an innovation in software protocol that at the first time founds its real-world massive application in Bitcoin that solved the double solving problem in digital currency. A few years in the future, blockchain will be put into use because it has some characteristic that only unique in blockchain technology, such as:
- The data is copied in multiple nodes, it means if a hacker wants to attack, he needs to attack all of the nodes.
- Once stored in the blockchain, the data cannot be altered/edited.
- Every block is connected to the previous block and the following block, it means if a hacker wants to attack or change the data, he needs to change the data in all of the block.
- We can run a smart contract in the blockchain, that enables the creation of a new business model by elimination middleman or central authority.
Based on the characters and core values that blockchain provides, here are some categorization (but not limited to) of how the blockchain technology solve problems in various industries:
-
Industries that need a faster value (example: money) transfer than traditional fiat money. Example: remittance, clearing and settlement of securities.
-
Industries that involved many stakeholders that do not trust each other - or stakeholder are competing with each other but in some situation also cooperate with each other. Example: Ports, Supply Chain.
-
Industries that are before blockchain need big money commitment to do transaction and because of it, the industries faced liquidity problem. For example to buy property or car need a lot of money. Now using blockchain technology, the property can be tokenized so buyer can buy the token with lower money commitment. This increase liquidity in the market. This is called “fractional ownership”.
-
Industries that needs immutability (can not be changed) character of the blockchain database, and the database can be accessed by all stakeholders. Example: public sector that deals with land registrations, education sector that deals with certificate.
-
Technology startup industries (example: social media, ecommerce marketplace, search engine, on demand startups) where the stakeholders think that they think they have a problem with the intermediary or middleman.
- The product they use have middleman with bargaining power that is too high, because this middleman got a lot of user data and sell it to advertisers (sometimes, illegally and without profit sharing with the users).
- Middlemen that take fees too high, from the users or merchants. And this fees can be reduced using blockchain & smart contracts - it reduced the cost of verification.
- Middlemen that is not really transparent about how things works: Games, Betting
-
Industries that have silo data sharing problem - sometimes before blockchain, the data is stored in various different institutions. Example: medical records, land registrations, Identity.
-
Industries that values digital content highly and need the digital content to be unique, secure and valuable in the digital era. Example: Games / digital goods, music/video, copyrighted content, digital collectibles, vote, carbon credit, social credit score.
1.2. Vexanium
Vexanium is the next generation blockchain software that is designed for Decentralized Apps (Dapps) Usability and retail penetration. Vexanium will make blockchain applicable to enhance various industries. Vexanium focuses to solve the bottleneck and critical pain points of blockchain technology such as speed, scalability, usability and flexibility. The parallel processing technology and asynchronous communication methodology from Vexanium allow Dapps to operate and transact by processing simultaneously without having to increase load from the network. Free transaction charges. Vexanium’s ownership structure allows free usage by the user and eliminates transaction charges. Blockchain project developers are allowed to use resources in proportion to their stake instead of the standard pay-per-transaction model Vexanium blockchain architecture has the potential to scale to millions of transactions per second. Using Vexanium technology, the deployment of the blockchain project will be faster, easier and more affordable.
1.3. Technical Features
Vexanium blockchain uses C++ programming language for its smart contract programming language. C++ is the most studied programming languages in university and already has a lot of libraries - so developers don’t have to “reinvent the wheel”. C++ is known as “low-level language” that gives huge control for developers in terms of running the code and managing resources. C++ has superiority in speed, efficiency and safety and is widely used in “performance critical” application.
The C++ code is compiled in WebAssembly (WASM) and the smart contract is executed by WASM virtual machine.
WebAssembly is a low-level binary format for the web. It’s not a programming language you are going to write.
https://developer.mozilla.org/en-US/docs/WebAssembly/Concepts
https://flaviocopes.com/webassembly/
VEXANIUM uses C++ as its smart contract programming language. C++ is a popular programming language among developers around the world. Therefore, any developer who is familiar with C++ is not required to learn a new programming language and is more than ready to learn VEXANIUM’s API, which will be covered in this onboarding series. Once familiarity with VEXANIUM’s API has been achieved, a developer will be able to program VEXANIUM smart contracts using C++.
Underlying VEXANIUM is a WebAssembly (WASM) virtual machine which executes smart contract code. WASM is also used by other important internet infrastructure software developed by Google, Microsoft, Apple, and others. The design choice of using WASM enables VEXANIUM to re-use optimized and battle-tested compilers and toolchains which are being maintained and improved by a broader community. In addition, adopting WASM standard also makes it easier for compiler developers to port other programming languages onto VEXANIUM.
1.4. Stack

A typical interaction with the Vexanium blockchain.
Smart Contract/CDT
VEX.CDT is a toolchain for WebAssembly (WASM) and set of tools to facilitate contract writing for the VEXANIUM platform. In addition to being a general purpose WebAssembly toolchain, VEXANIUM specific optimizations are available to support building VEXANIUM smart contracts. This new toolchain is built around Clang 7, which means that VEX.CDT has the most current optimizations and analyses from LLVM. However, as the WASM target is still considered experimental, some optimizations are not available or incomplete.
Nodeos
Nodeos is the core VEXANIUM node daemon. Plugins can be used to configure nodeos to execute with various features. Nodeos handles all peer-to-peer networking, contract code scheduling, and the blockchain data persistence layer. For development environments, nodeos can also be used to setup a single node blockchain network.
Cleos/Keosd
Keosd is a key manager for VEXANIUM accounts that comes with VEXANIUM.
Cleos is the command line tool which enables developers to deploy, test, and configure nodeos as well as VEXANIUM smart contracts.
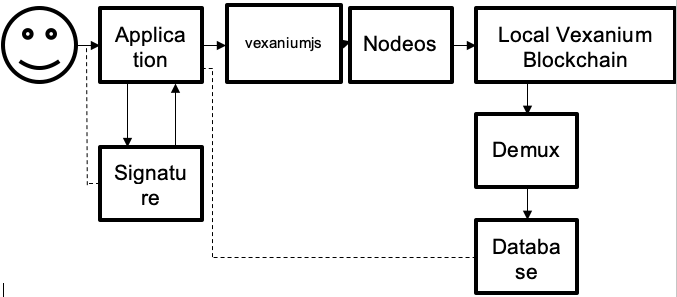
A typical user's interaction with an VEXANIUM DApp.
VEXANIUMJS
A Javascript API SDK for integration with VEXANIUM-based blockchains using the VEXANIUM RPC API.
Demux
Demux is a reference implementation of a backend infrastructure pattern which can be used to route blockchain events from a VEXANIUM based blockchain to queryable datastores, or also, to trigger side effects.
Development Enviroment
2.1. Introduction
What you will learn in this chapter:
- How to quickly spin up nodes
- Manage wallets and keys
- Create accounts
- Write some contracts
- Compilation and ABI
- Deploy contracts
C/C++ experience
VEXANIUM based blockchains execute user-generated applications and code using WebAssembly (WASM). WASM is an emerging web standard with widespread support from Google, Microsoft, Apple, and industry leading companies.
At the moment the most mature toolchain for building applications that compile to WASM is clang/llvm with their C/C++ compiler. For best compatibility, it is recommended that you use the VEXANIUM C++ toolchain
C/C++ compiler. For best compatibility, it is recommended that you use the VEXIO C++ toolchain.
Other toolchains in development by 3rd parties include: Rust, Python, and Solidity. While these other languages may appear simpler, their performance will likely impact the scale of application you can build. We expect that C++ will be the best language for developing high-performance and secure smart contracts and plan to use C++ for the foreseeable future.
Linux / Mac OS Experience
The VEXANIUM software supports the following environments:
- Amazon 2017.09 and higher
- Centos 7
- Fedora 25 and higher (Fedora 27 recommended)
- Mint 18
- Ubuntu 16.04 (Ubuntu 16.10 recommended)
- Ubuntu 18.04
- MacOS Darwin 10.12 and higher (MacOS 10.13.x recommended)
Command Line Knowledge
There are a variety of tools provided along with VEXANIUM which requires you to have basic command line knowledge in order to interact with.
C++ Environment Setup
We can use any text editor that, preferably, supports C++ syntax highlighting. Some of the popular editors are Sublime Text and Atom. Another option is an IDE, which provides a more sophisticated code completion and more complete development experience. You are welcome to use the software of your personal preference, but if you're unsure what to use we've provided some options for you to explore.
Potential Editors and IDEs
Operating System of Development Environment
If using an OS on any flavor of linux, you'll be able to follow these tutorials with ease, this includes but is not limited to
- Mac OS
- Ubuntu
- Debian
Windows
If you are developing on Windows, unfortunately we do not provided powershell ports and instructions at this time. In the future we may append powershell commands. In the mean-time your best bet is to use a VM with Ubuntu, and set up your development environment inside this VM. If you're an advanced Window's developer familiar with porting Linux instructions, you should encounter minimal issues.
2.1. Before You Start
Step 1: Install binaries
This tutorial is going to use pre-built binaries. For you to get started as quickly as possible this is the best option. Building from source is an option, but will set you back an hour or more and you may encounter build errors.
The below commands will download binaries for respective operating systems.
Mac OS X Brew Install:
Shell
wget  https://vexanium.com/files/vex1.7.4bin_macos.zip
unzip vex1.7.4bin_macos.zip
Ubuntu 18.04 Debian Package Install:
Shell
https://vexanium.com/files/vex1.7.4bin_ubuntu18.zip
unzip vex1.7.4bin_ubuntu18.zip
Ubuntu 16.04 Debian Package Install:
Shell
wget https://vexanium.com/files/vex1.7.4bin_ubuntu16.zip
unzip vex1.7.4bin_ubuntu16.zip
Step 2: Setup a development directory, stick to it.
You're going to need to pick a directory to work from, it's suggested to create a contracts directory somewhere on your local drive.
Shell
mkdir contracts
cd contracts
Step 3: Enter your local directory below.
Get the path of that directory and save it for later, as you're going to need it, you can use the following command to get your absolute path.
pwd
Enter the absolute path to your contract directory below, and it will be inserted throughout the documentation to make your life a bit easier. This functionality requires cookies.
2.3. Setup and Start Your Node
Step 1: Boot Node and Wallet
Step 1.1: Start keosd
First let us start keosd:
Shell
keosd &
You should see some output that looks like this:
Text
info  2018-11-26T06:54:24.789 thread-0  wallet_plugin.cpp:42          plugin_initialize    ] initializing wallet plugin
info  2018-11-26T06:54:24.795 thread-0  http_plugin.cpp:554           add_handler          ] add api url: /v1/keosd/stop
info  2018-11-26T06:54:24.796 thread-0  wallet_api_plugin.cpp:73      plugin_startup       ] starting wallet_api_plugin
info  2018-11-26T06:54:24.796 thread-0  http_plugin.cpp:554           add_handler          ] add api url: /v1/wallet/create
info  2018-11-26T06:54:24.796 thread-0  http_plugin.cpp:554           add_handler          ] add api url: /v1/wallet/create_key
info  2018-11-26T06:54:24.796 thread-0  http_plugin.cpp:554           add_handler          ] add api url: /v1/wallet/get_public_keys
Press enter to continue
Step 1.2: Start nodeos
Start nodeos now:
Shell
 nodeos -e -p vexanium \
 --plugin vexanium::producer_plugin \
 --plugin vexanium::chain_api_plugin \
 --plugin vexanium::http_plugin \ --access-control-allow-origin='*' \ --contracts-console \
 --http-validate-host=false \ --verbose-http-errors >> nodeos.log 2>&1 &
These settings accomplish the following:
- Run the Nodeos. This command loads all the basic plugins, set the server address, enable CORS and add some contract debugging and logging.
- Enable CORS with no restrictions (*) and development logging
Step 2: Check the installation
Step 2.1: Check that Nodeos is Producing Blocks
Run the following command
Shell
tail -f nodeos.log
You should see some output in the console that looks like this:
Text
1929001ms thread-0   producer_plugin.cpp:585       block_production_loo ] Produced block 0000366974ce4e2a... #13929 @ 2018-05-23T16:32:09.000 signed by eosio [trxs: 0, lib: 13928, confirmed: 0]
1929502ms thread-0   producer_plugin.cpp:585       block_production_loo ] Produced block 0000366aea085023... #13930 @ 2018-05-23T16:32:09.500 signed by eosio [trxs: 0, lib: 13929, confirmed: 0]
1930002ms thread-0   producer_plugin.cpp:585       block_production_loo ] Produced block 0000366b7f074fdd... #13931 @ 2018-05-23T16:32:10.000 signed by eosio [trxs: 0, lib: 13930, confirmed: 0]
1930501ms thread-0   producer_plugin.cpp:585       block_production_loo ] Produced block 0000366cd8222adb... #13932 @ 2018-05-23T16:32:10.500 signed by eosio [trxs: 0, lib: 13931, confirmed: 0]
1931002ms thread-0   producer_plugin.cpp:585       block_production_loo ] Produced block 0000366d5c1ec38d... #13933 @ 2018-05-23T16:32:11.000 signed by eosio [trxs: 0, lib: 13932, confirmed: 0]
1931501ms thread-0   producer_plugin.cpp:585       block_production_loo ] Produced block 0000366e45c1f235... #13934 @ 2018-05-23T16:32:11.500 signed by eosio [trxs: 0, lib: 13933, confirmed: 0]
1932001ms thread-0   producer_plugin.cpp:585       block_production_loo ] Produced block 0000366f98adb324... #13935 @ 2018-05-23T16:32:12.000 signed by eosio [trxs: 0, lib: 13934, confirmed: 0]
1932501ms thread-0   producer_plugin.cpp:585       block_production_loo ] Produced block 00003670a0f01daa... #13936 @ 2018-05-23T16:32:12.500 signed by eosio [trxs: 0, lib: 13935, confirmed: 0]
1933001ms thread-0   producer_plugin.cpp:585       block_production_loo ] Produced block 00003671e8b36e1e... #13937 @ 2018-05-23T16:32:13.000 signed by eosio [trxs: 0, lib: 13936, confirmed: 0]
1933501ms thread-0   producer_plugin.cpp:585       block_production_loo ] Produced block 0000367257fe1623... #13938 @ 2018-05-23T16:32:13.500 signed by eosio [trxs: 0, lib: 13937, confirmed: 0]
Press ctrl + c to close the log
Step 2.2: Check the Wallet
Open the shell and run the cleos command to list available wallets. We will talk more about wallets in the future. For now, we need to validate the installation and see that the command line client
cleos is working as intended.
Shell
./cleos wallet list
You should see a response with an empty list of wallets:
 Wallets:
        [ ]
From this point forward, you'll be executing commands from your local system (Linux or Mac)
Step 2.3: Check Nodeos endpoints
This will check that the RPC API is working correctly, pick one.
- Check the
get_infoendpoint provided by thechain_api_pluginin your browser: http://localhost:8888/v1/chain/get_info. - Check the same thing, but in the console on your host machine
Shell
curl http://localhost:8888/v1/chain/get_info
2.4. Install the CDT
The VEXANIUM Contract Development Toolkit, CDT for short, is a collection of tools related to contract compilation. Subsequent tutorials use the CDT primarily for compiling contracts and generating ABIs.
Starting from 1.3.x, CDT supports Mac OS X brew, Linux Debian and RPM packages. The easiest option to install would be using one of these package systems. Pick one installation method only.
Homebrew (Mac OS X)
Install
Shell
brew tap vex/vex.cdt
brew install vex.cdt
Uninstall
Shell
brew remove vex.cdt
Ubuntu (Debian)
Install
Shell
wget https://vexanium.com/files/vex1.7.4bin_ubuntu16.zip
unzip vex1.7.4bin_ubuntu16.zip
sudo apt install ./vex.cdt_1.6.1-1_amd64.deb
Uninstall
Shell
sudo apt remove vex.cdt
Install from Source
The location where vex.cdt is cloned is not that important because you will be installing vex.cdtas a local binary in later steps. For now, you can clone vex.cdt to your "contracts" directory previously created, or really anywhere else on your local system you see fit.
Text
cd CONTRACTS_DIR
Download
Clone version 1.6.1 of the vex.cdt repository.
Text
git clone --recursive https://github.com/vexanium/vex.cdt
cd vex.cdt
It may take up to 30 minutes to clone the repository
Build
Shell
./build.sh
Install
Shell
sudo ./install.sh
The above command needs to be ran with sudo because vex.cdt's various binaries will be installed locally. You will be asked for your computer's account password.
Installing vex.cdt will make the compiled binary global so it can be accessable anywhere. For this tutorial, it is strongly suggested that you do not skip the install step for vex.cdt, failing to install will make it more difficult to follow this and other tutorials, and make usage in general more difficult.
Troubleshooting
Getting Errors during build.
- Search your errors for the string "/usr/local/include/eosiolib/"
- If found,
rm -fr /usr/local/include/eosiolib/or navigate to/usr/local/include/and deleteeosiolibusing your operating system's file browser.
2.5. Create Development Wallet
Wallets are repositories of public-private key pairs. Private keys are needed to sign operations performed on the blockchain. Wallets are accessed using cleos.
Step 1: Create a Wallet
The first step is to create a wallet. Use cleos wallet create to create a new "default" wallet using the option --to-console for simplicity. If using
cleos in production, it's wise to instead use --to-file so your wallet password is not in your bash history. For development purposes and because these are development and not production keys --to-console poses no security threat.
Shell
./cleos wallet create --to-console
cleos will return a password, save this password somewhere as you will likely need it later in the tutorial.
Shell
Creating wallet: default
 Save password to use in the future to unlock this wallet.
 Without password imported keys will not be retrievable.
"PW5Kewn9L76X8Fpd....................t42S9XCw2"
Step 2: Open the Wallet
Wallets are closed by default when starting a keosd instance, to begin, run the following
Shell
./cleos wallet open
Run the following to return a list of wallets.
Text
./cleos wallet list
and it will return
 Wallets:
        [
        "default"
        ]
Step 3: Unlock it
The keosd wallet(s) have been opened, but is still locked. Moments ago you were provided a password, you're going to need that now
Text
./cleos wallet unlock
You will be prompted for your password, paste it and press enter.
Now run the following command
Text
./cleos wallet list
It should now return
 Wallets:
 [
 "default *"
 ]
Pay special attention to the asterisk (*). This means that the wallet is currently unlocked
Step 4: Import keys into your wallet
Generate a private key, cleos has a helper function for this, just run the following.
Text
./cleos wallet create_key
It will return something like..
  Created new private key with a public key of:
 "EOS8PEJ5FM42xLpHK...X6PymQu97KrGDJQY5Y"
Step 5: Follow this tutorial series more easily
Enter the public key provided in the last step in the box below. It will persist the development public key you just generated throughout the documentation.
Step 6: Import the Development Key
Every new VEXANIUM chain has a default "system" user called "vexanium". This account is used to setup the chain by loading system contracts that dictate the governance and consensus of the VEXANIUM chain. Every new VEXANIUM chain comes with a development key, and this key is the same. Load this key to sign transactions on behalf of the system user (vexanium)
Shell
./cleos wallet import
You'll be prompted for a private key, enter the vexanium development key provided below
5KQwrPbwdL6PhXujxW37FSSQZ1JiwsST4cqQzDeyXtP79zkvFD3
```javascript

Never use the development key for a production account! Doing so will most certainly result in the loss of access to your account, this private key is publicly known.

Wonderful, you now have a default wallet unlocked and loaded with a key, and are ready to proceed.
2.6. Create Test Accounts
What is an account?
An account is a collection of authorisations, stored on the blockchain, and used to identify a sender/recipient. It has a flexible authorisation structure that enables it to be owned either by an individual or group of individuals depending on how permissions have been configured. An account is required to send or receive a valid transaction to the blockchain
This tutorial series uses two "user" accounts, bob and alice, as well as the default vexanium account for configuration. Additionally accounts are made for various contracts throughout this tutorial series.
Step 1: Create Test Accounts
In a previous step, you created a wallet and created a development key pair. You were asked to place that public key into a form, but either you skipped this step or have cookies disabled. You will need to replace YOUR_PUBLIC_KEY below with the public key you generated.
Throughout these tutorials the accounts bob and alice are used. Create two accounts using cleos create account
Shell
./cleos create account eosio bob YOUR_PUBLIC_KEY
./cleos create account eosio alice YOUR_PUBLIC_KEY
You should then see a confirmation message similar to the following for each command that confirms that the transaction has been broadcast.
Result
executed transaction: 40c605006de...  200 bytes  153 us
# eosio <= eosio::newaccount
{"creator":"eosio","name":"alice","owner":{"threshold":1,"keys":[{"key":"VEX5rti4LTL53xptjgQBXv9HxyU...
warning: transaction executed locally, but may not be confirmed by the network yet ]
Step 2: Public Key
Note in cleos command a public key is associated with account alice. Each VEXANIUM account is associated with a public key.
Be aware that the account name is the only identifier for ownership. You can change the public key but it would not change the ownership of your VEXANIUM account.
Check which public key is associated with alice using cleos get account
Shell
./cleos get account alice
You should see a message similar to the following:
Text
permissions:
     owner     1:    1 VEX6MRyAjQq8ud7hVNYcfnVPJqcVpscN5So8BhtHuGYqET5GDW5CV
        active     1:    1 VEX6MRyAjQq8ud7hVNYcfnVPJqcVpscN5So8BhtHuGYqET5GDW5CV
memory:
     quota:       unlimited  used:      2.66 KiB

net bandwidth:
     used:               unlimited
     available:          unlimited
     limit:              unlimited

cpu bandwidth:
     used:               unlimited
     available:          unlimited
     limit:              unlimited
Notice that actually alice has both owner and active public keys. VEXANIUM has a unique authorization structure that has added security for you account. You can minimize the exposure of your account by keeping the owner key cold, while using the key associated with your active permission. This way, if your active key were ever compromised, you could regain control over your account with your owner key.
In term of authorization, if you have a owner permission you can change the private key of active permission. But you cannot do so other way around.
Troubleshooting
If you get an error while creating the account, make sure your wallet is unlocked
Shell
./cleos wallet list
You should see an asterisk (*) next to the wallet name, as seen below.
Text
Wallets:
[
"default *"
]
2.7. How to Deploy Vexanium BP Node
Important Notes:
-
The minimum server requirements is dual‑core CPU, 4G RAM, 100G hardrive,and the recommended system is 64‑bit ubuntu 18
-
Vexanium mainnet cannot be deployed on the same server as the EOS mainnet, meaning that one server can only deploy one mainnet. This is to preventunusual errors during deployment
-
Before the deployment of Vexanium node, please get familar with EOS‑related documents, the use of command client and RPC API use for example
-
For BP registration, you need get a mainnet account first.
BP Node Deployment
This is the Vexanium deployment plan based on linux ubuntu.
1. Download the release file apt-get update && apt-get install -y wget unzip
For ubuntu18:
wget [http://209.97.162.124:8060/vex1.7.4bin_ubuntu18.zip](http://209.97.162.124:8060/vex1.7.4bin_ubuntu16.zip)
For ubuntu16:
wget  [http://209.97.162.124:8060/vex1.7.4bin_ubuntu16.zip](http://209.97.162.124:8060/vex1.7.4bin_ubuntu16.zip)

unzip  vex1.7.4bin_ubuntu**.zip
2. Preparation
Generate a public/private key pair for BP node. Execute the command as follows:
./cleos create key --to-console
Execution result as follows:
Private key:  **5J9ZDeDPvsgCqxyHvYagrNKQxWTqQwiiZ5RPbAJ3gyhvvER795a**

Public key:  **VEX6vJnArfJm7Txiw5uYCRpovNZ3QNw4EXw5Wtk529cWAkViDSwDg**
Public key will be used during BP registration later, that is regproducer.
Get a mainnet account as producer-name with the Public key, for example account producertest.
3. Excute the following commands to startup bp node
sudo nohup ./nodeos --max-irreversible-block-age -1 --contracts-console --genesis-json ./genesis.json --blocks-dir ./data/blocks --data-dir ./data --chain-state-db-size-mb 1024 --http-server-address 127.0.0.1:80 --p2p-listen-endpoint 0.0.0.0:8090 --max-clients 5 --p2p-max-nodes-per-host 5 --enable-stale-production --producer-name **producertest** --signature-provider=**VEX6vJnArfJm7Txiw5uYCRpovNZ3QNw4EXw5Wtk529cWAkViDSwDg**=KEY:**5J9ZDeDPvsgCqxyHvYagrNKQxWTqQwiiZ5RPbAJ3gyhvvER795a**--plugin eosio::http_plugin --plugin eosio::chain_api_plugin --plugin eosio::producer_plugin --p2p-peer-address 209.97.162.124:8091 39.105.124.20:8092 > nodeos.log 2>&1 &
4. BP Registration
Create local wallet:
./cleos wallet create --to-console
Import bp account private key to the wallet:
./cleos wallet import --private-key **5J9ZDeDPvsgCqxyHvYagrNKQxWTqQwiiZ5RPbAJ3gyhvvER795a**
Execute command to register:
./cleos --url http://209.97.162.124:8080 system regproducer **producertest VEX6vJnArfJm7Txiw5uYCRpovNZ3QNw4EXw5Wtk529cWAkViDSwDg** [https://producertest.com](https://producertest.com/)
There are 2 conditions for block production:
-
Top 21 BPs can produce blocks
-
Local BP node syncronization is complete
5. BP claim reward
If your BP produced blocks, you can claim BP reward every 24 hours.
Execute command to claim reward:
./cleos --url http://209.97.162.124:8080 system claimrewards **producertest**